Post Sale Operations
Complete transactions and maintain efficient payment flows post-sale through ChargeAfter.
You can make several post-sale operations using ChargeAfter to manage your transactions easily and effectively including:
- Settling a charge
- Refunding a charge
- Voiding a charge
The following guide takes you through how post-sale operations can look and how to complete them.
Overview
A charge is created after you complete an order using ChargeAfter as a payment option. The charge is in AUTHORIZED status initially (the below images are for example purposes only):

Note
You can access instructions on how to enable / disable automatic payment capture by clicking [here] (https://help.shopify.com/en/manual/payments/payment-authorization)
An entry with information about the charge is added to the Timeline in the Orders page of the store’s admin site. The entry title says $XXX.XX was authorized on ChargeAfter, shown below:
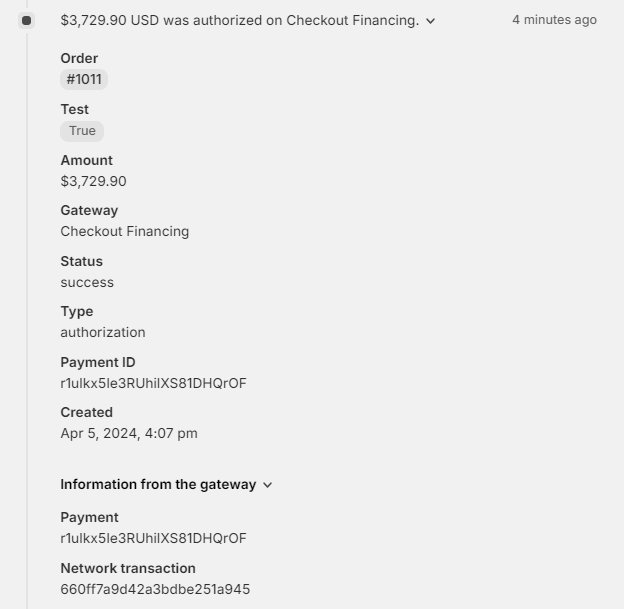
Note
The first record for a payment method (Authorization or Automatically capture) contains a Network Transaction value with ChargeAfter charge ID
Shopify doesn't include an order ID. Instead, you can use the payment's id attribute from merchantOrderId field to search for the corresponding order in the Shopify admin.
Settling a charge
A charge can only be settled (captured) once and in full. Follow these steps to settle a charge:
- In the store’s admin site, go to Orders on the left side menu > select All orders > select order > scroll to Payment section. Click on the Capture payment button:

- The Capture payment dialog pops up. The amount on the text box is the charge total. For orders made through a lender that provides an open line of credit, the charge total is equal to the order total. For lease-to-own orders, the charge total excludes sales tax. Click on the green Accept $XXX.XX button:

- The following displays:

Two new entries are recorded in the Order's Timeline. The first entry, on the very bottom of the image below, says a $XXX.XX USD capture is pending on ChargeAfter. The second entry, on top of the first, says $XXX.XX USD was captured on ChargeAfter:

Refunding a charge
A charge can be refunded either partially or fully. Multiple partial refunds can be issued. Follow these steps to refund a charge:
- In the store’s admin site, go to Orders > All orders > select order > click Refund at the top of the page:

- Select the items you wish to refund. Under Refund shipping, enter the shipping amount you wish to refund. Click on Refund $XXX.XX:

- The following displays:

- Two new entries are recorded in the Order's Timeline. The first entry, outlined furthest below, says a $XXX.XX USD refund is pending. The top entry, fourth from the bottom, says You refunded $189.23 USD on ChargeAfter:
.png")
Note
It may take several minutes for the confirmation refund entry to be added to the timeline.
Voiding a charge
Cancelling an order placed through ChargeAfter effectively voids a charge. Follow these steps to void a charge:
- In the store’s admin site, go to Orders > All orders > select order > click on More actions at the top of the page > select Cancel order:

- The Cancel order dialog pops up. Click on the Cancel order button:

- Two new entries are recorded in the Order's Timeline. The second entry from the bottom says You canceled the order. The top entry says You voided the authorization on ChargeAfter:

Updated 14 days ago